I am so excited to show you all.... So lets dive right in... some of my photos are oof (out of focus) pardon that but you will get the jist of it... my mother took them she was playing withe my camera... FAILED! lol
Step 1: Three paper lunch bags rotating the ends so they are opposite
Step 2: Line the bags up and fold them in half.
Step 3: For this album I drew a line and made slits for my ribbon with my craft knife... you can also use a hole punch or there are many types of book/album biding materials that work too.
Here is where the real fun begins!! Decorating your pages. This is the cover of mine I used my colorbox cat's eye ink around the edges and various scraps of paper I had to create my cover. It says first birthday on it but really I am using it to put pictures and little notes and things in about his first year of life!
This is the first set of pages in the album. Unfortunately my pictures were not ready when I was in town earlier today so they will be added later (I may update the post to show you some of them when they are on and in the pockets of the album). The little man take is an additional pocket that I have not finished the item to go in. These Paper bag albums are great as you can keep adding things to them.
These are the tags in the first pocket of the album... the blank one says smash on the back and I am going to be putting a couple pictures of him with his 1st Birthday cake making a complete mess!
This is the second set of pages nothing really special going on here... I have a great black and white pictures coming small enough to go on the page that says baby on it!
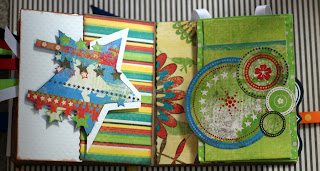
This is the 3rd set of pages in the album the colors are so bright and fun I absolutely love it... the star is put on with pop up dots so it is lifted on the page and I cut it out with my craft knife i think it turned out awesome again I am not sure exactly what else I am going to put on here I am thinking a picture of his favorite green teddy... or something along those lines.. yes I create things sometimes without really knowing what I am going to do with it.
This is the 4th set of pages.. I really love it the pocket on the top has a little tag that says " I love you" and then a note I put in there about his nickname... the other side is also an additional pocket and I am going to put some of his milestones in it... when he first rolled over, crawled, took his first steps, etc
These are those tags from inside of that pocket I created...
There is one more set of pages for me to finish, one more pocket of tags, notes, and photo things I have to pull out to show you and the back cover... unfortunately I have a photoshoot to do this evening and will not have time to get it finished... unless I get ambitious when I get home... which is a good possibility. I really want to get this thing done!
On another note.. I really liked making this paper bag/ mini album and have decided that I will feature at least one a month on my blog... who knows maybe one day one will be a giveaway or something along those lines... we will see... as for the dresser project I was hoping to start today looks like it is getting postponed till tomorrow, the life of having a 1 year old nothing ever works out as friends...
Happy crafting ladies I can't wait to show you some more.


No comments:
Post a Comment