Followers

Monday, May 23, 2011

Card-making marathon!

Thats what I have been on... and then remembered that Kenny K Downloads had a DT call up, and since I love his stamps and use them all the time I figured during my marathon was the perfect time to come up with a card for this... so here it is...


I used Kenny K's Hockey Digi on this one, and colored with with my beloved Prisma Colors!!! I think it turned out fantastic I love distressing and inking things, and layering paper as well as adding dimension!! 
Thank you all for looking, and wish me luck!!!

I have been a card making machine

Hello crafty people, I haven't accomplished much this long weekend at home but last night I got ambitious and completed 8 cards and I have 4 more that I am just looking for sentiments for. If anyone knows of any great places to buy digital sentiments please let me know, I would love you forever!!


This stamp comes from GTC Stamps, I love this owl and he comes along with 4 sentiments as well as a blank bubble. Unfortunately the papers are from my scraps so I have no idea whose they are, I do know they are not all from the same line, ha ha. I am working on fixing this I am starting to label my scraps so that I know where they come from

I hope everyone had themselves a lovely long weekend, mine would have been better if it did not rain one entire day away, and then part of another. Today it is cold and gloomy outside, I guess that means more time for crafting! I have a DT project I want to get done as well as some more cards.


Aren't these just fantastic Father's Day cards!! The images are from Phindy's Place, I absolutely adore her work. The sentiment was just printed off of Microsoft word. The inside of the card reads "I want to be just like you, Dad!"

Sorry about the photo quality I know I usually do better then that but it was 11 at night in the basement so cut me some slack lol. 


A birthday card, I love Kenny K I think I own almost all of his stamps and impatiently wait every month for more to come out! I got this sentiment before I had them all organized by designer, so unfortunately I can not tell you where it comes from. But if you tell me I would love to catalog it so I know for future use!


A little boy rocket Birthday card.. again this mystery sentiment!! I should know this paper line but it is downstairs on my table and I am sitting in the living room, so if I remember I will note it later!


How about a buddy card!! I love these images I have lots of them!! And love them, I use them all the time. 


How about a Little Monkey Card, it could be used for almost anything. But I loves it!!!


Another horrible picture... the black blobs are actually bling.. lol. This image and sentiment also comes from GTC Stamps.. 


Thought's of you. It is a pretty, happy, springy card. 


Sunday, May 22, 2011

Recipe Card Box Tutorial

Here is my challenge/tutorial for this month over at Pages In Time! It is a recipe card box for my Be a Cooking Goddess Challenge over there. Make one of these and feel free to enter it there for a chance to win a darling RAK from me!!

So here is the Tutorial!


This ^^^^^ right there that is what I want you to create!!!

It is a Recipe Box that will hold 6x6 recipe cards, that means you can write them out on cards and scrap them and make them pretty!!!!!!!!

Well here is where the Tutorial comes into play... I will give you the directions on how to make this...
so here we go....


What you will need is

A strong adhesive (Score tape or hot glue)
score board
1 piece of thin chipboard or heavy card stock measuring 7"x12"
1 piece of thin chipboard or heavy card stock measuring 7x9
2 pieces of heavy card stock measuring 6x6
5 pieces of heavy card stock measuring 7x6
2 pieces of Patterned paper measuring 6 3/4" x 2 1/4"
2 pieces of Patterned paper measuring 6 3/4 x 6 1/4"

If you are using heavy card stock for the entire box you will need another piece or car stock measuring 7x 2 1/4" to reinforce the bottom.

you will also need embellishments of your choice.


Take your 7"x12" piece and score it at 2 1/2" , 5", and 11 1/2"
then fold it to look like the pictures above


Take your 7" x 9" piece and score it along the 9" side at 2 1/2"
Then fold to look like the picture above


Glue the above 2 pieces together so they look like the pictures above... the 1/2" gets glued to the 2 1/2" piece to make the base of the box.


This is when you will take your pieces of patterned paper and adhere them to the basis of the box on the front back and the top (if you are using just card stock this is where you will adhere the extra piece of card stock to the bottom.


Take your 2 pieces of 6" x 6" card stock and score it every 1/2"
then fold like the picture above


Then take your 5 pieces that measure 7" x 6" these are your dividers, attach them to pieces you just folded like the pictures above.
The last picture above the top will be the back and the bottom is the front


Then adhere your divider piece into the box


Your finished box should look similar to this.. there are many ways to keep the front flap closed, I usually use Velcro.

Happy crafting!

Saturday, May 21, 2011

My little secret garden

I made this for the May Chippie Challenge over at Pages in time! It was a wonderful little fence that I could almost not bring myself to paint *painting the chippie was the challenge for this month!*

Well here is my project...


Is that fence not fantastic, I used up a bunch of random things on this, all the paper besides the green was scraps, the flowers are all handmade, the trinkets are from my stash!


Here is a closer shot of the handmade flowers behind that gorgeous orange fence, the chippie was supplied by 3tailscraft!!!   


There are some more close up shots for you all, the stamps in the backround are from Close to My Heart, the line is D1306 Treasure Life!

If you have any questions feel free to contact me. I would love to and usually leave more info then this but I am in a hurry I have some projects on the go here. Talk to you all soon

Happy Crafting!

Friday, May 20, 2011

Sorry I am a day late... but never the less here it is....

Its the Thursday sketch from over at Pages in Time... and this time Traci outdid herself.


There it is scrappers isn't it splendid!!!


And here is my take on the sketch, most of the papers are from BoBunny's Timeline. The charms and the key are just random things I had in my stash. Also, as usual, all of my flowers are handmade. 

The twist on my version of the sketch is that the page actually folds in half and is also the teaser of this months mini-album which I hope to finish up and show you all the weekend. It is so fantastic.

On a different note has anyone seen the sneak peek at G45's new Wizard of OZ paper line! I am so freaking excited for it.

Happy crafting!!

Monday, May 16, 2011

Matchbox Monday

Hello crafty people... I hope everyone had a fabulous weekend... I know I did I got my crafty space all cleaned up (not that you could tell now) I finished a couple swaps over at SB.com, as well as the weekly LO for Pages in time (unfortunately the sketch won't be out until thursday so you have to wait till then to see it), but in the mean time hop on over there and check out the sketch from this week as well as the challenges we have going on. We would love to have you hang out in our neck of the woods and let us see your lovely work!

On to what I accomplished today, I finished my matchbox for a swap I am in and here it is for you all


I love it... I almost wish I could keep it... the image is a digi stamp that I have been dying to use and fit perfectly for the music themed matchbox. I used a clock charm that is hanging as well as a key glued to the bottom, I hadmade the mini rose just to add some more romance to the inside of the box. The handle on the front is just a really large eyelet button type thing that I glued on instead of setting!


And finally here is my may kit swap, the color, I am pretty sure you can figure it out was green, the other stipulations were 4 pieces of paper 6x6, 3 dragon flies (I quilled mine), 3 flowers (oops i made a few more), 12 inches of ribbon (again I gave more lol) and one blinged out item, its hard to see from here but I covered the bottom of the bottlecap in stickles then put a protector thing over that and glued and rhinestone in the center then adhered a clock charm over top it looks great, as well as one other "boy" type thing, I gave a stamp of a turtle I have. The other extra's were some breads, and a tag. I really hope my pal likes it!

Sunday, May 15, 2011

BLAH!!!

I was hoping to have this months mini ready to show you today... but alas it is not quite finished.. I am however going to have a teaser of it to show you this evening... and depending how determined I get it may get finished... we will see... thank you to all my followers I loves you all... I also have a recipe box tutorial that I will post up here on Wed, and if you feel so inclined to have it earlier hope on over to Pages in time and it is in the forum there, I am also offering a RAK over there for it if you sign up and post it! Its worth doing I know you all love free things!!!!

Monday, May 9, 2011

The rest of my Sunday

So the online crop entries over at Pages In Time close in about 18 minutes... and here are the last three projects I got finished...

To start there was a use 3 non scrapbooking things challenge and I made a mothers day card from my son to his grandma... and here it is


And then I did a LO for the game piece challenge as well as the two photo LO challenge and here that is...


And finally is my tag and the 2nd entry for the embossing challenge


Sorry that I did not have much to say about these things today but I am so tired... I hope you enjoyed my projects.

Happy crafting!


Sunday, May 8, 2011

Another weekend...

I have a few things to show you all today... some from last week... a new one from this weekend... and an evening of crafting yet to come...

But first things first... I got my Etsy store up, just waiting to get my banner and things exactly the way I like them and then it will go up and so will the rest of my items. In the meantime I did list my first item, you can see it here. I am pretty excited about this!


Here is a fun little card I made for the Pages in Time Embossing Challenge. I think it turned out wonderful, once again I am unsure of where the stamp came from as I had it before I started keeping track of where they come from, silly me lesson learned. The sentiment is my own writing. The embossing is the white paper in the backround.


Here is the LO I made for the Sketch Challenge over at Pages in time. It was such a pretty sketch that I just had to do it even though I had no pictures in mind for it. 


We had a bunch of games happen to over at Pages In Time for the online crop it was a wonderful time, this was one of the last games we had was to create clothes for the paper dolls in honor of the Royal wedding and here are mine!

I will be back again later this evening with some more things for you all, I am going to finish my challenges for this crop tonight and will show them off for you all later.


Sunday, May 1, 2011

Sorry I haven't been posting this weekend... but I have been

cropping like a mad women for an online crop over at Pages in time! It's been a busy weekend, of card making, altering items, and today its onto a few lay outs. It has been a great weekend visiting with some ladies, making new friends, playing games (I hate hide and seek), and crafting!

Well here is a peek at what I have accomplished so far....

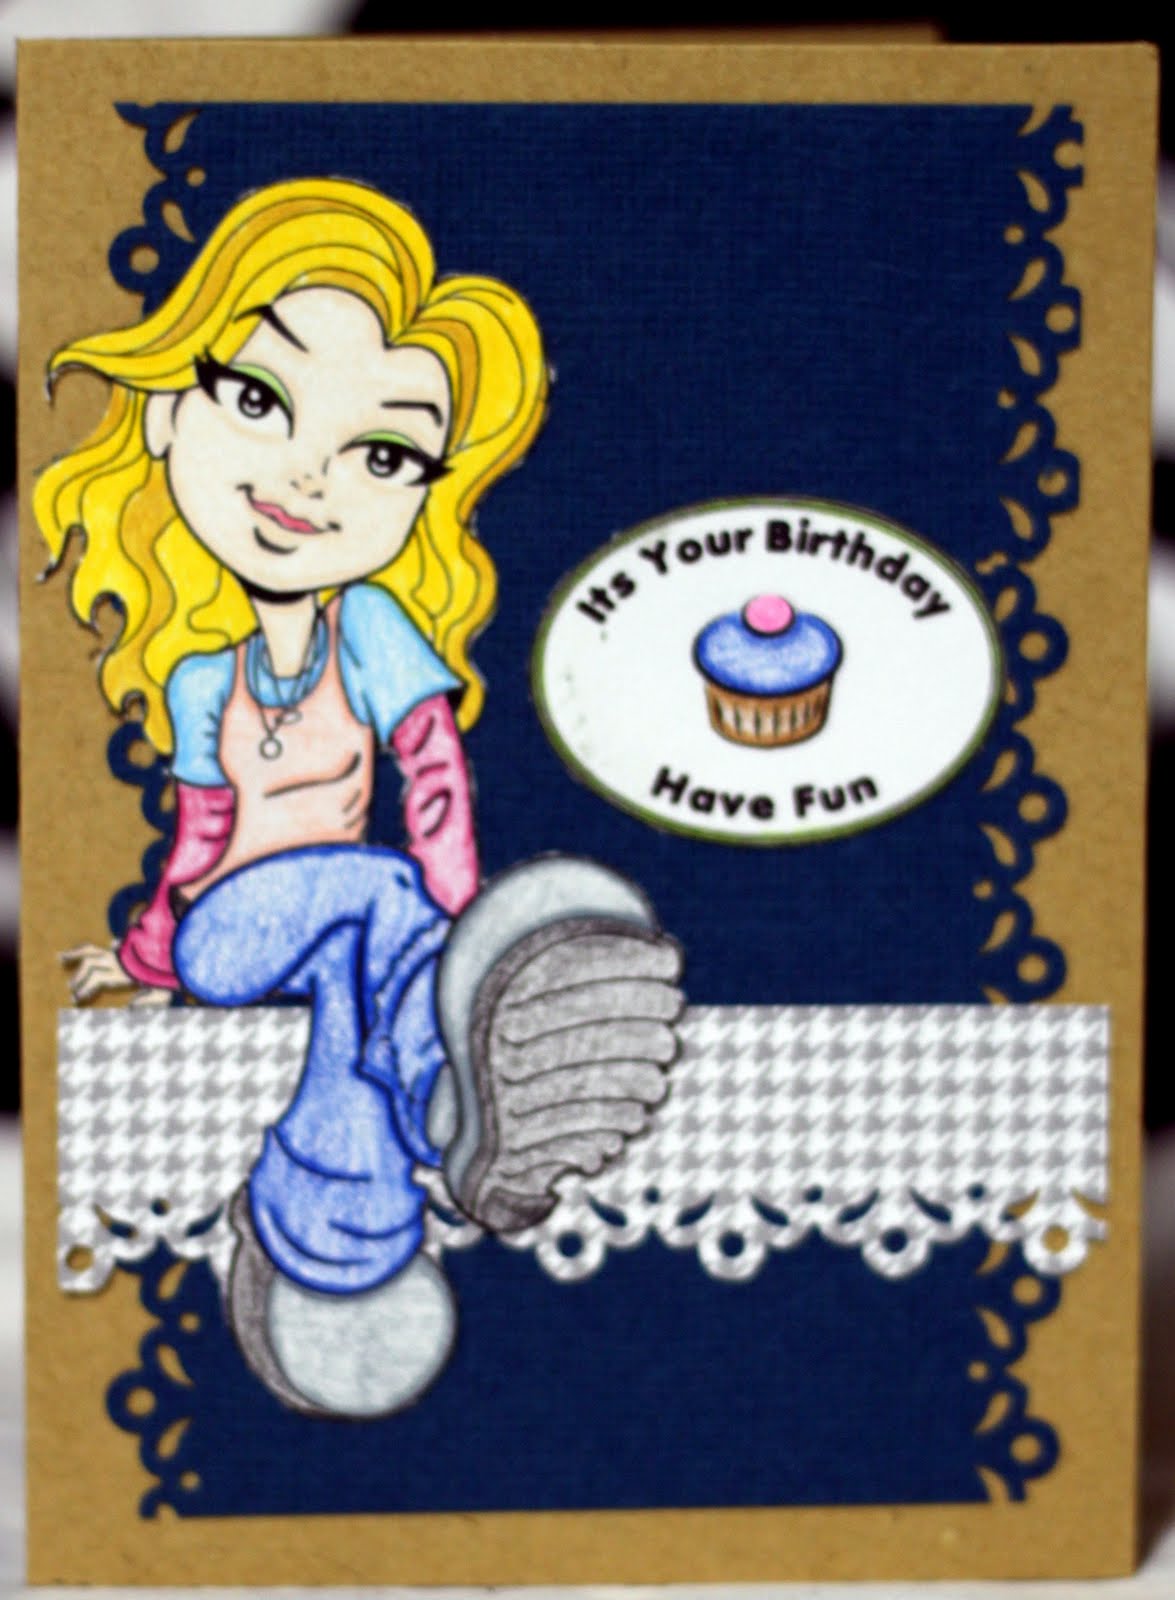
The first project I completed was a card for Hide and Seek, trust me I dislike hide and seek, but thanks to a great lady giving the location of the image away, I completed it, and here is the card!


Then I finished the Dare to Distress Challenge, for this all the papers used were from BoBunny's Mamarazzi Collection


Here is the front of my altered item for this challenge. Isn't it ever so cute!!!! I got this mini dresser at dollarama for a toonie! And now it looks wonderful... everything on this is distressed in someway,  the papers here on the front are all distressed and inked, the buttons have been sanded on the outside edge, the gems were covered with Tim Holtz Distress Ink in peeled paint. 


Here is a view of the front and one side, the leaves were cut out and then crumpled and distressed and covered in glimmer mist, then dried and I put Tim Holtz Vintage Photo on the edges (the edges of the drawers have Vintage Photo on them as well), there is also lace from my stash and liquid pearls!


Here is the other side, notice how the leaves wrap slightly around, the stamps are embossed and are from Close to my Heart.


Here is the back and the embossed side. I love the way the flowers and leaves go across the back of the dresser. 


And the other side and the back, I love the way the flowers and leaves all flow together around and down the dresser!


The top, where the flowers start to head down the dresser, there is also an embossed stamp here. 

I hope you enjoyed this project I really loved making it. Wish me luck when the winners are chosen, the ladies over there are all so talented!

After I completed that dressed I went onto the 
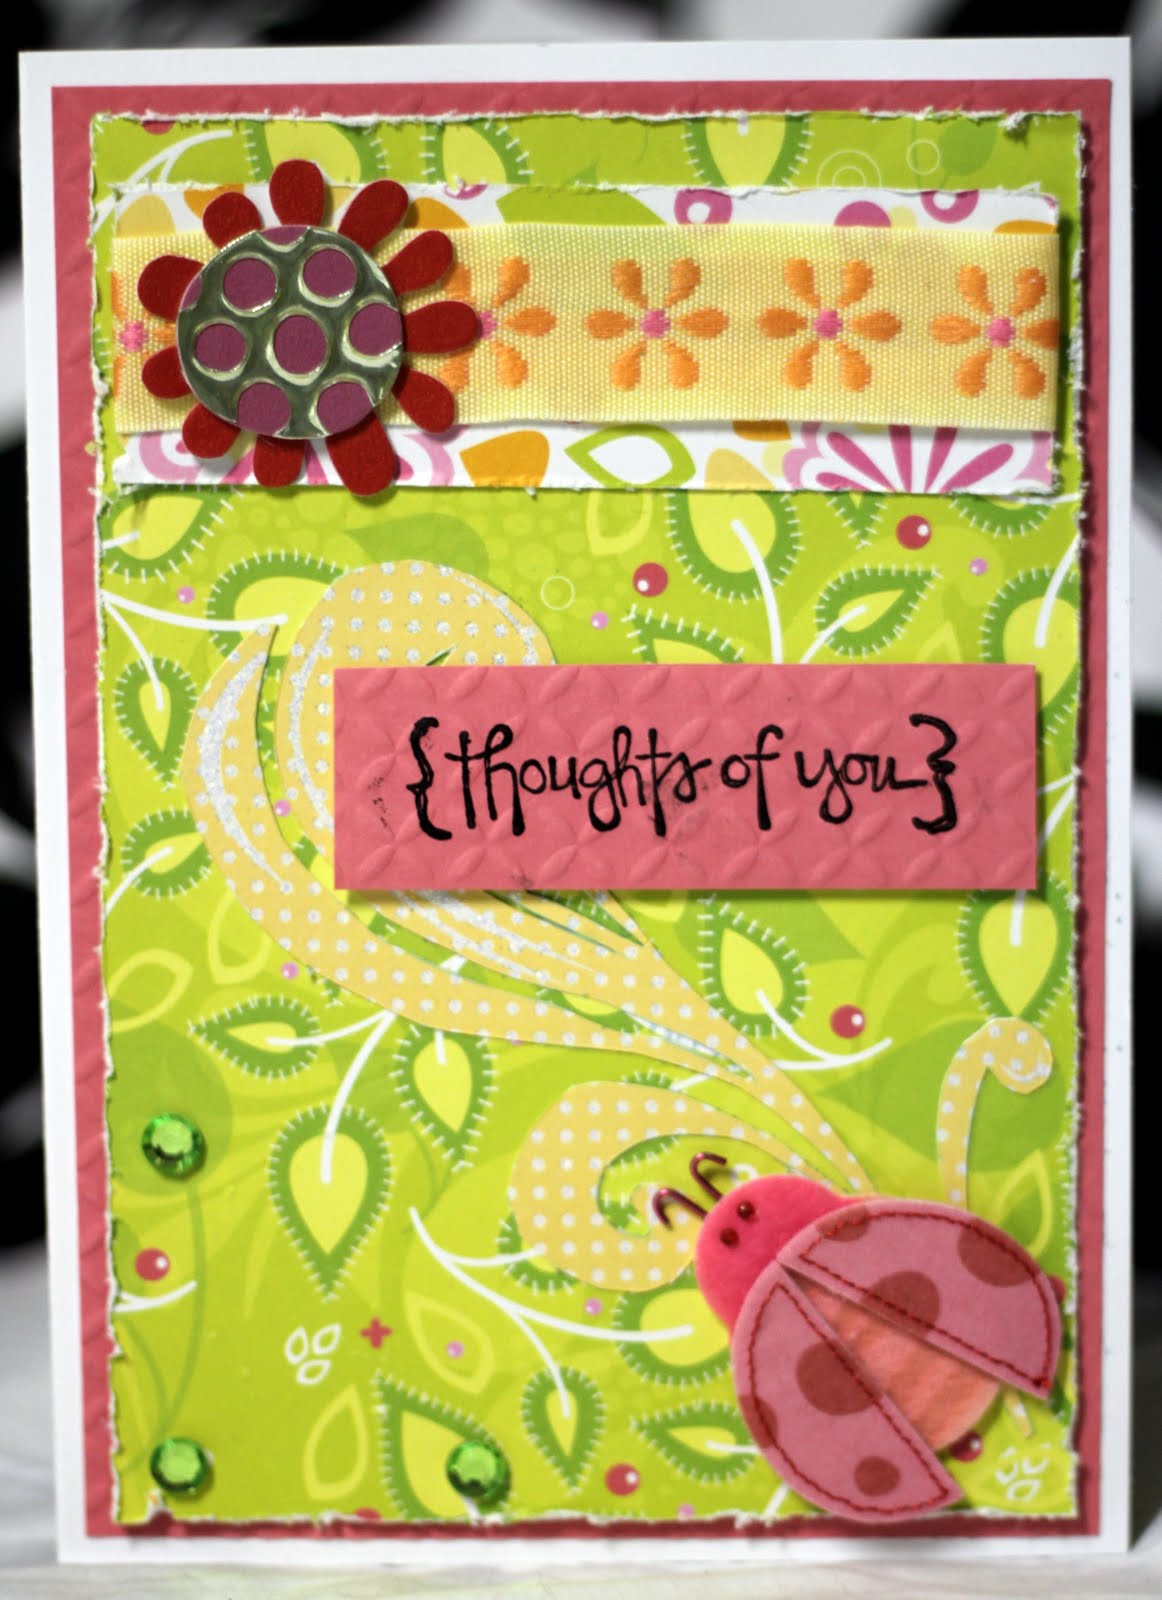
The Tag You're it! Challenge. This one was amazing, it had a few different rules then just to distress, there was stamping needed, chipboard needed, stickles, a handmade flower, distressing it was a busy tag! But I think it turned out great... well here it is.


Isn't it pretty the houndsooth (thanks Becky for teaching me that word!) paper is from Teressa Collins, and the stamp is from Kraftin Kimmy!

The final one I have to show you today is 
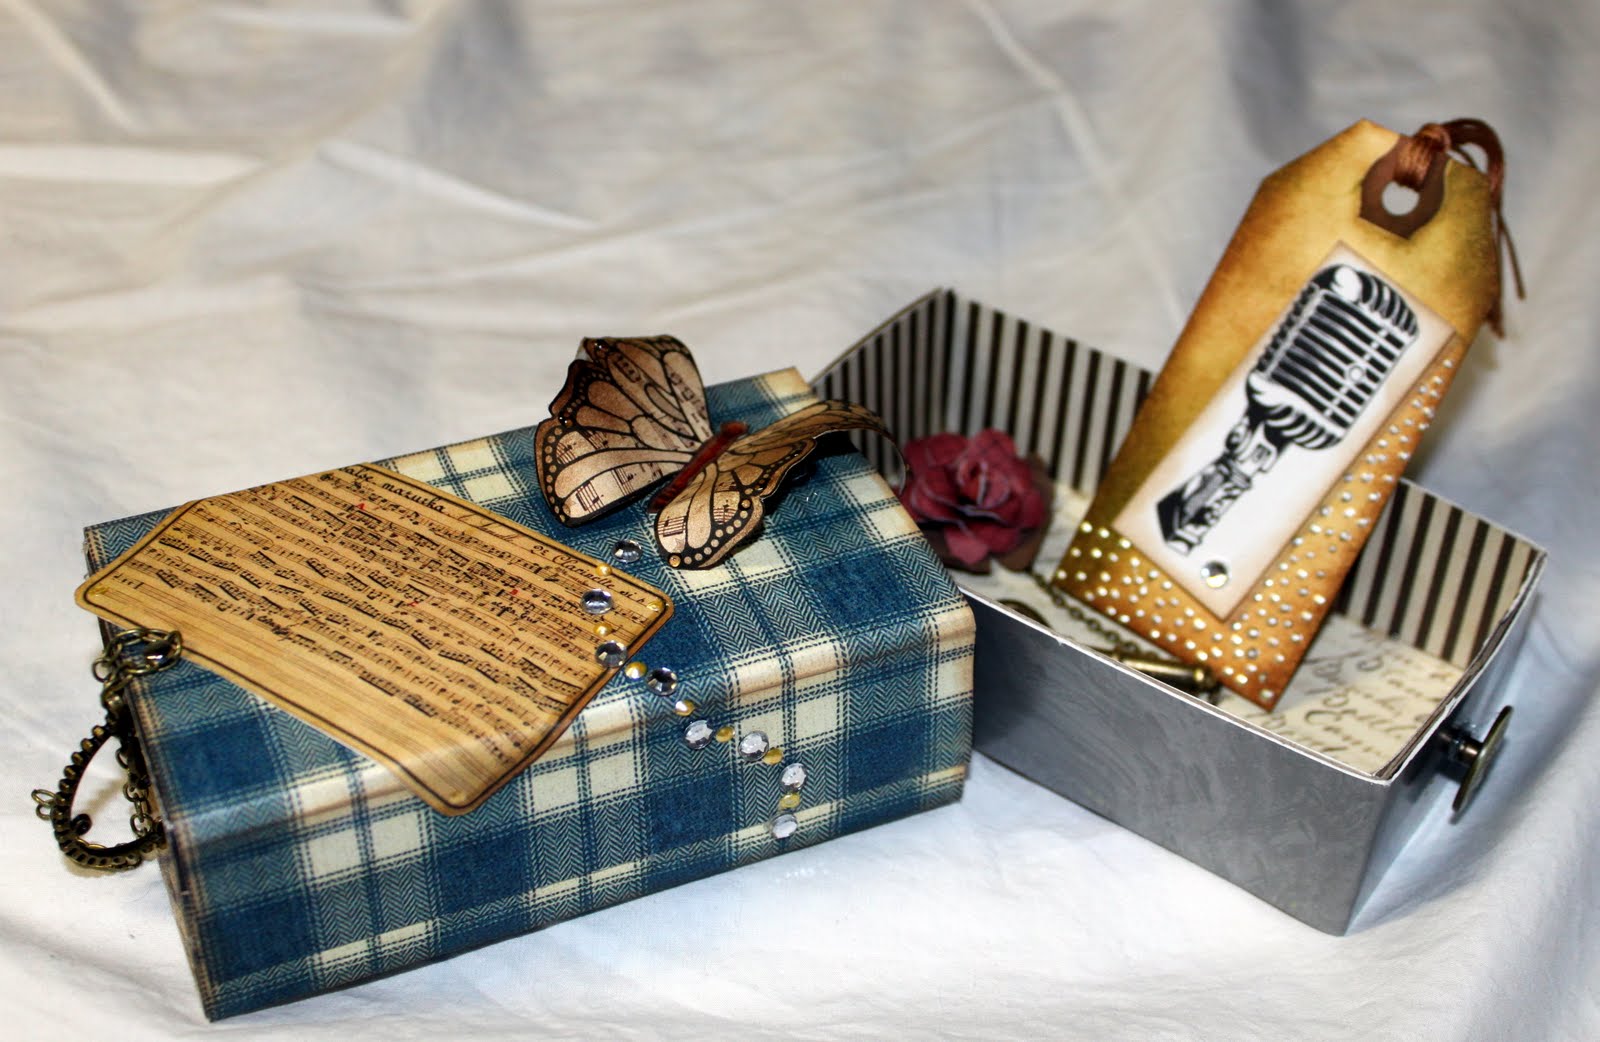
The Color Inspiration Challenge. This was from Becky and it was screaming for a match box!! (If you would like to see the color pallet image for inspiration the link takes you directly to it. 


So here it is for you... some of the papers are from the BoBunny Gabrielle collection the rest are random ones from my scraps (sorry I can't remember who they are) I think turned out ever so cute... I get to make another one for Martica's swap over at SB.com, but it will be a music themed one I am pretty excited for it!

Happy Crafting! I am off to work on some more challenges!